- Are you running your app using the Parse.com BaaS?
- Do you want a quick guide to fast track move your Parse Server into the cloud?
- Do you want to survive the upcoming Parse shutdown?
I was in a similar predicament... a new app developed against the mighty Parse BaaS, and then they announced their impending closure.
Luckily we hadn't released our production version yet, and thought it was wise to migrate across before we were live, and had thousands of users and uploaded images to migrate.
This is one of the current pain points, there is no easy way to migrate files stored in the Parse database. If you are live and need to transfer files, you probably will need to write a process that iterates through all the files and exports them into S3 yourself, updating any references to them.
The first question to ask is:
Amazon EBS or Heroku
I read all the articles about whether it is best to go with Amazon and use EBS for Parse, or just use Heroku. It seems the consensus is Heroku is a great start, but EBS is better for advanced users wanting more flexibility and cheaper pricing.
I actually tried EBS first, wanting to go with an 'all Amazon' approach. But didn't find the setup process that intuitive, and read some online comments of users having problems with the suggested response being just to use Heroku. The Heroku set up steps all made sense and I was up and running pretty quickly.
One nice thing with Heroku is that it connects directly to a git repository which you can edit and update as you wish, and when you push changes back into it, Heroku can automatically deploy these (or you can manually trigger an update). With Amazon EBS I wasn't able to find a way of doing this so have stuck with Heroku for the time being. Apparently it is possible, just not as nicely integrated. The user interface for setting up apps is also a bit slicker on Heroku and so far it has been working well.
The beauty of using MongoDB and S3 for our data storage means we aren't tied into using either Heroku or EBS, we can switch from one to the other at will, they are just essentially middleware routing requests from the apps through to the database, so if we ever outgrow one system it is pretty painless to switch to the other :-)
Create the MongoDB
The first step is to create the MongoDB where we will store our data.
1) Go to mlab.com and create your database.
2) Choose Amazon as your Cloud Provider (based in US East for best latency)
3) Then if you are creating a Dev database, choose a Single-node Sandbox (free) or for Staging and Productin DBs, choose the Replica set cluster starting with a Shared Cluster, or if you already know that you will need something larger, choose the relevant size.
4) Give your database a name. In my case I am creating three environments, so they will be something like:
- appname
- appname-staging
- appname-dev
For each database once created you will need to make a note of the MongoDB connection string (as needed to connect via URI) and create a database user that can connect to that database.
Migrate Parse Data to MongoDB
Once your database is created, we can now go to Parse and ask it to migrate your data across.

Simply go to you settings in Parse and look for the migration option. Note your MongoDB needs to be empty, so if you have created any test data in there, just clear it out.
Start the migration and wait for a screen like the above to appear. This means your data is now across in MongoDB. You can refresh your database view in MLab to see your tables.
NOTE: Files are not migrated, but the links to the files should still work, ie your app will be able to display the images via the SDK. From my understanding Parse are working out how to migrate files and there will probably be some kind of tool to do this at some point in the future.
It will ask you to finalize the migration, but at this point there will be no turning back. Follow my checks first and if all good then finalize away.
Fork Parse Server on Github
This step sets you up with your own Parse Server code base. We are making a fork (ie copy) of the Parse Server code that you can then modify. We will need some modifications unfortunately since the Parse Server code isn't set up out of the box to support S3 via config variables, which is what we need.
Once you master this part, you will then be able to make any other changes to the Parse Server code base you need and automatically deploy to Heroku as necessary.
First of all make sure you have a Github account. Then visit the Parse-Server-Example repo page:
https://github.com/ParsePlatform/parse-server-example
This will look something like this:
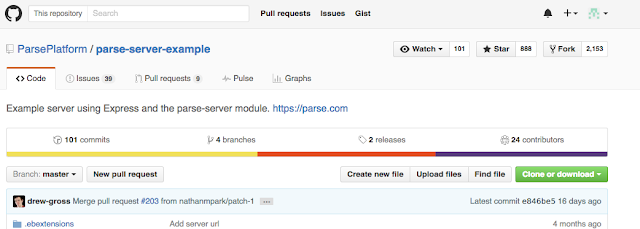
At the top right you will see 'Fork'. Select this to create a fork of the repository in your own account, and note this fork will be public. It doesn't matter if it is public since it is only a copy of what is already public and our small modification that we will do later isn't going to matter.
One good aspect of this forking means you are making a snapshot of the Parse Server at this point in time, and you can choose when to update your fork from the parent, ie if in the future when a newer Parse Server is released.
Add S3 Connectivity to Parse Server
Unfortunately when Parse Server starts up, it uses a file storage adapter (GridStoreAdapter) which saves the files into the database. There is a nifty document here which shows exactly how to update Parse to use either S3 or GCS (Google Cloud Storage).
https://github.com/ParsePlatform/parse-server/wiki/Configuring-File-Adapters#configuring-s3adapter
Even though the above documentation makes it look like we can just pass a few S3 variables (including bucket name, access key and secret key), I can assure you this isn't the case and we actually need to modify the Parse Server startup code to read in those variables.
There are a few steps here, being:
1) Install git on your PC. https://git-scm.com/downloads
2) Open up a terminal window or command prompt
3) Navigate to a folder where you want to keep a copy of the Parse Server source
4) Make a directory for the Parse Server: >mkdir Parse-Server-Example
5) Change into that directory
6) Clone your forked repository into this directory:
>git clone https://github.com/yourname/parse-server-example.git
7) You will probably be asked for your Github credentials at some point
8) Checkout the master branch >git checkout master
9) Open up the index.js file in the root directory of the repository
10) Modify this file to include the reference at the top of the file to S3 and the reference to the S3Adapter in the creation of the ParseServer with the three environment variables:

NOTE: Do not hard code your S3 keys into this file. Your forked repository is still publically accessible, only use environment variables as per my example above which will get read int automatically as the server initializes.
For easier cutting and pasting, the code is:
Code changes needed to index.js to support Amazon S3 file support:
...
var S3Adapter = require('parse-server').S3Adapter;

var api = new ParseServer({
  databaseURI: databaseUri || 'mongodb://localhost:27017/dev',
  appId: process.env.APP_ID || 'APPLICATION_ID',
  masterKey: process.env.MASTER_KEY || 'MASTER_KEY',
  ...
  filesAdapter: new S3Adapter(
    process.env.S3_ACCESS_KEY,
    process.env.S3_SECRET_KEY,
    process.env.S3_BUCKET,
    {directAccess: true}
  ),
  ...
});
You will note we have cleverly added in references to environment variables. This way we can deploy the same code to prod, staging and dev, and each environment can have it's own S3 bucket access settings.
11) Now we need to check this change in. This step saves our change into the repository locally. >git commit -a -m "Added S3 support"
12) Now we need to push this locally saved change into the remote hosted forked repository
>git push origin master
At this point now we have a freshly updated Parse Server in our Github account with S3 connectivity. Note there are also other useful modifications you could make to the Parse Server, but you can do those another time.
Amazon S3 Setup
The same article listed above has the steps for creating an S3 bucket for storing files. They are listed again here. We need to create the bucket (basically a folder to keep the files in), and a restricted user that can only access this bucket.
- Log into your AWS account or create a new one.
- Head to the S3 service and choose Create Bucket
- Fill out a unique Bucket Name and click Create. The bucket name should not contain any period '.' for
directAccess to work. All other defaults are OK.
- Now head to the Identity and Access Management (IAM) service.
- Click the Users tab, then Create New User.
- Fill out at least one user name and make sure Generate an access key for each user is selected before clicking Create.
- Make sure to Download Credentials on the next screen.
- Now select the Policies tab, then Create Policy.
- Select Create Your Own Policy, fill out a Policy Name.
Copy the following config in Policy Document, changing BUCKET_NAME for the name of the bucket you created earlier. (note: this is a little more permissive than Parse Server needs, but it works for now)
{
    "Version": "2012-10-17",
    "Statement": [
        {
            "Effect": "Allow",
            "Action": [
                "s3:*"
            ],
            "Resource": [
                "arn:aws:s3:::BUCKET_NAME/*"
            ]
        }
     ]
 }
- Make sure to Validate Policy first, then click Create Policy.
- Go back to the Users tab and select the user you created earlier.
- In Permissions, select Attach Policy and find the policy we just created to attach it.
You will need to keep track of the S3 access key, secret key and bucket name. These variables will be added to your Heroku App config variables.
| S3_ACCESS_KEY | The AWS access key for a user that has the required permissions. | Required |
| S3_SECRET_KEY | The AWS secret key for the user. | Required |
| S3_BUCKET | The name of your S3 bucket. Needs to be globally unique in all of S3. | Required |
Deploy Parse Server to Heroku
Go into Heroku and create your Heroku App. If you are collaborating with other developers on this, then create a team first. It is always possible to move your personal Heroku apps into the team later if you need to.
The information to do this is nicely listed here:
https://devcenter.heroku.com/articles/deploying-a-parse-server-to-heroku
It follows steps similar to this:
1) Create new app: "test-parse-server"
2) Connect to GitHub and then connect to your parse-server-example forked repository
3) Manual deploy the git repository to your newly created app.
4) Set up the config variables to point to MongoDB and S3. (Covered in next section)
NOTE: Ignore the mention of the MongoDB add-on. This is only necessary if you want Heroku to create a MongoDB for you.
Connect Heroku to MongoDB
At this point you have Heroku running, but no database connectivity. We need to point the Parse Server to your MongoDB. Note if you added the MongoDB add-on in the previous step Heroku will actually do this part for you, but since I want control over how I set it up and the name of the database etc, I will do this manually.
You will need to go to your Heroku app settings and select Reveal Config Vars under settings and enter settings for the following:
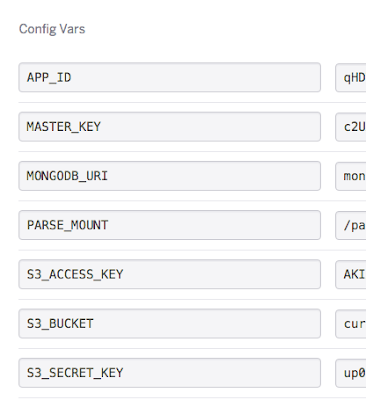
The first two are the IDs that Parse expects. I used the Parse App ID and the Parse Client Id that I already had, this saves me from having to change them in my source code, however you can put any two random password keys into these two fields. You will need to use the APP_ID one in your client app though when you initialise your Parse instance in code. This is how the server knows who is allowed to talk to it.
The MONGODB_URI is your full MongoDB connection string with username and password embedded into the string.
PARSE_MOUNT is just set to '/parse' and it just lets you define the top level folder name to use when connecting to Parse on your Heroku App.
The last three are the S3 keys and bucket name that we have previously configured.
Load up all of these config variables and then restart your dynos (drop down option menu).
Put the URL of your app into your browser and you will see one line of text appear, similar to this:
Test Connectivity between Heroku and Mongo
Even though the Parse Server might be displaying a line of text correctly, we actually want to make sure that we can talk to the Parse Server and get it to update the data in the Mongo DB we are connected to.
There are a couple of ways to test whether our Parse Server is talking to our Mongo DB, but using the Chrome Advanced REST client is probably the easiest.
Simply download it from the Chrome Web Store:
https://chrome.google.com/webstore/detail/advanced-rest-client/hgmloofddffdnphfgcellkdfbfbjeloo
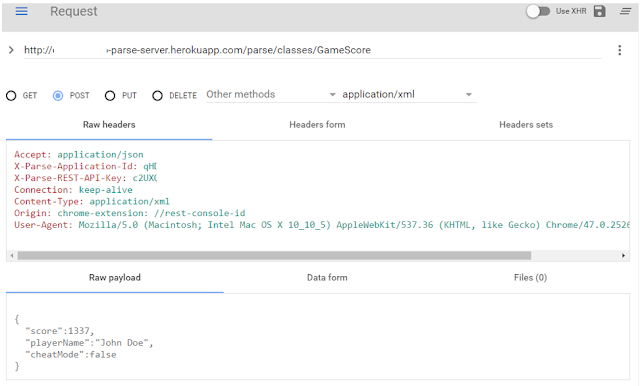
Fire it up and load up our settings as per the below:
1) For the URL use the Heroku App url, with the mount you specified (ie parse) and then choose /classes/ and the name of the entity class you want to create, eg:
URL: http://test-parse-server.herokuapp.com/parse/classes/GameScore
2) For Raw Headers, set the following:
Accept: application/json
X-Parse-Application-Id: qHDTJ.....
X-Parse-REST-API-Key: c2UX.......
Connection: keep-alive
Content-Type: application/xml
Origin: chrome-extension: //rest-console-id
User-Agent: Mozilla/5.0 (Macintosh; Intel Mac OS X 10_10_5) AppleWebKit/537.36 (KHTML, like Gecko) Chrome/47.0.2526.106 Safari/537.36
I used the Parse App Id and for the REST API key, the Parse Client Id. (aka our Heroku Master Key).
3) For the Raw Payload, set the data you want to load into your GameScore table, eg:
{
"score":1337,
"playerName":"John Doe",
"cheatMode":false
}
If you then POST this request, you will get a JSON response like this:
{
"objectId": "USJTHXDjYh"
"createdAt": "2016-06-09T05:37:50.544Z"
}
The fact you are getting an objectId returned, means this object has been created in the database successfully. And in fact if you now refresh your database in your MLab dashboard, you will see a new Collection called GameScore with the newly created row.
See below for a screenshot (note my ids and url are obscured)

Custom Subdomain
This is a nice feature that allows you to use your own subdomain instead of the Heroku generated one.
There are three steps here:
1) Choose a domain you want to use, for example parse.yourdomain.com
2) Set the CNAME record via your domain provider DNS dashboard. It will look something like the below screenshot, which shows www going to the herokuapp URL. (use your subdomain name and heroku url).
3) Add the domain to the Heroku dashboard under Settings.

It will take a bit of time for your DNS settings to propagate, but then you will be able to use your own domain for accessing your Parse Server.
Parse Initialisation Update
In your Client App you will now need to update your code to call the new Parse Server you have set up.
Old initialisation code:
// Default initialization using main Parse Server
Parse.initialize(this);
New initialisation code:
// Initialize Parse using our Heroku Parse Server & MongoDB
Parse.initialize(new Parse.Configuration.Builder(this)
        .applicationId("your_app_id")
        .clientKey("your_client_id")
        .server("http://parse.yourdomain.com/parse/")
        .build()
);
Or even better, since you might have several 'product flavors', what I am doing is this:
Parse.initialize(new Parse.Configuration.Builder(this)
        .server(getBaseContext().getString(R.string.parse_server))
        .build()
);
This means you only need to initialise Parse once with the above line of code, and every flavor of your app (dev, staging and production) gets its own strings.xml file which would contain:

Populate your own id, key and server name. And in fact if you have a custom domain set up, then use this.
NOTE: One of the gotchas is that you need to remember to add a trailing slash to your mount name, ie /parse/ Even though you don't specify the trailing slash in the config variables, it does need to be present in your server URL that you pass in, otherwise you will get a 502 Bad Gateway error.
Testing Client Application & S3
Now is a good time to run your app. If you already had a working app running on Parse, then it should still work, but now running against Heroku and using MongoDB / S3 as a backend.
Perform some actions in the app that will update the database and also store files, then check both the MongoDB and S3 to see if the relevant data and files have been stored. In the case of S3, the files are just stored in one long list.
Surprisingly, I did all of the above for three environments, without too much drama and my setup worked cleanly. No unusual issues, not to many stumbling blocks, just a lot of research and follow through to find the best way to run my own Parse Server, and now having got this far thought it would be useful to share with the rest of the BaaS community!
Good luck and happy Parse Serving....
UPDATE FROM ONE WEEK LATER
Running Parse Dashboard on Heroku
Well this has to be one of the more insanely annoying things I have had to try and work out, however finally managed to get this to work, the steps being roughly:
1) Fork the Parse Dashboard git repository at:
https://github.com/ParsePlatform/parse-dashboard
2) Clone it locally so we can make some changes to it. Not sure why I had to do this, but there is actually a bunch of initialisation code in the index.js file and too much logic for my brain to comprehend, so I flushed out the various if statements and replaced with a single line loading the config from an environment variable.
See below for my updated example of index.js
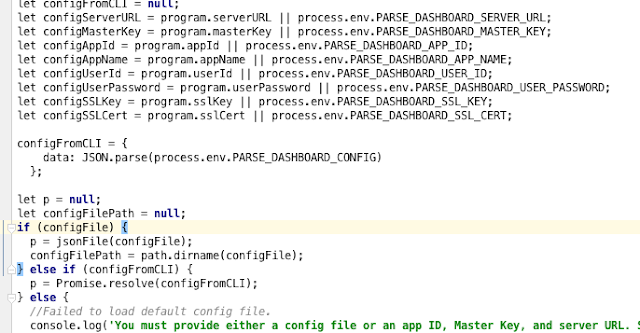
The key part to note is:
configFromCLI = {
    data: JSON.parse(process.env.PARSE_DASHBOARD_CONFIG)
  };
I pulled it out of the if statement and made it appear right after the bunch of 'let's and before the resolving. This essentially forces my forked version of Parse Dashboard to load the config entirely from the environment variable called PARSE_DASHBOARD_CONFIG
NOTE: Unlike other articles we don't want to hard code our access keys into source code, especially since the forked repository is public, and secondly because these things are meant to be changed frequently and are per environment.
Push the above change back to the repository.
3) In Heroku, connect your app to this repository and manually deploy.
4) Add a subdomain, dashboard.[yourdomain].com like we did before. Just makes it nice and clean to access your dashboard.
5) Add in a config variable under settings called: PARSE_DASHBOARD_CONFIG
This will look something like this:
{
"apps": [
{
"appId": “XXXXXXXXXXXXXXXX",
"masterKey": “YYYYYYYYYYYYYYY",
"appName": “Development App"
},
{
"appId": "XXXXXXXXXXXXXXXX",
"masterKey": "YYYYYYYYYYYYYYY",
"appName": “Staging App"
},
{
"appId": "XXXXXXXXXXXXXXXX",
"masterKey": "YYYYYYYYYYYYYYY",
"appName": “Production App"
}
],
"users": [
{
"user":”admin-username",
"pass":”admin-password"
}
Please replace the appId and masterKeys with the ones you set up in the Parse Server.
Note I have three apps listed, dev, staging and production. There is also a user account to limit access. This means you only need one Parse Dashboard to access all three apps and their databases.
6) I updated a bunch of other config variables in my attempt to get this to work, here at the ones left in my settings:

You will probably need the first one, ie allow insecure = 1, and you will definitely need the 4th one down (already talked about that one), but the others aren't needed I don't think, since this info is being passed through on the 4th one. Using the CONFIG variable and embedding the entire config in there allows us to have as many apps set up as we like.
7) Restart dynos and then go to: https://dashboard.yourdomain.com
8) It should all be coming up now with the usual blue screen of Parse, allowing you to quickly access tables and data, and it is like a breath of fresh air compared to using the MLab MongoDB interface for viewing or updating data :-)
TROUBLESHOOTING
1) Check the logs for the app in Heroku. This is under the More button. After a restart or deploy you should see a line in there, something like this "dashboard is now available":

If you don't see that, then the dashboard isn't available and you will need to do more debugging.
2) Check your config is correct, braces correct, etc.
3) Try running the dashboard locally. This worked well for me. Place your config into the parse-dashboard-config.json file, install Node.js, then run the dashboard:
>npm run dashboard
You should see a similar line such as above. Note however when I ran this locally I was using a fresh unadulterated copy of the Parse Dashboard code. If you try to run it with the index.js modified, then it probably won't since it will have lost the logic to load the config from a file.


